Sunday, 1 May 2011

Double Decker Peanut Butter Sandwich Cookies

This is officially My 100th Post!!!  Since it is kind of a big deal, I didn't want to share just any recipe with you.  I wanted something that would knock your socks off!!  These peanut butter cookies will do just that! 
Words cannot describe how amazing these cookies are.  I saw these cookies on about three different blogs, but they all got the recipe from All Recipes.  They have amazing reviews and even after reading everyone's comments, raving about how good these are, I was still shocked at how good they really are.

If you like peanut butter, you will go nuts over these.  The cookie is chewy and the filling is so creamy and amazing that you are guaranteed to eat a few spoonfuls of it all by itself!  These are truly decadent.  You will probably not be able to eat more than one of these in the same sitting, because they are very rich, but the one you do eat, you will savor each and every bite.  I followed the cookie recipe exactly, but I adjusted the filling recipe to my own taste.  I like lots of filling in my cookies, so I increased the original recipe by 50% and I added a little vanilla, salt and I used milk instead of cream.
Double Decker Peanut Butter Sandwich Cookies
adapted from: Savory Sweet Life and All Recipes

3/4 c. all-purpose flour
1/2 tsp. baking soda
1/4 tsp. baking powder
1/2 tsp. salt
8 Tbl. (1 stick) unsalted butter, room temp.
1/2 c. creamy peanut butter
1/2 c. sugar
1/2 c. light brown sugar, packed
1 large egg
1 tsp. vanilla
1 c. quick-cooking oats

Filling:
4 1/2 Tbl. unsalted butter, room temp.
1/2 - 3/4 c. creamy peanut butter
1 1/2 c. powdered sugar
pinch of salt
1 tsp. vanilla
1-2 Tbl. milk

Preheat oven to 350 degrees.  Whisk together flour, baking soda, baking powder and salt; set aside.  In a large bowl, cream together butter, peanut butter, sugar and brown sugar until light and fluffy, about 4 minutes.  Scrape bowl.  Add the egg and vanilla.  Add the dry ingredients and beat until just combined.  Add the oats and beat just enough to distribute evenly.  Using a small ice cream scoop, drop dough onto cookie sheet, leaving 2-inches between each.  Bake for 10-12 minutes or until golden and puffed.  (I baked mine 11 minutes and I got 26 cookies, making 13 sandwiches.  They will look under-done, but they will set up).  Cool completely and place a spoonful of filling on half of the cookies and top with the other half to form a sandwich. 

Filling: Beat butter and peanut butter until fluffy.  Add powdered sugar and beat until combined.  Add a pinch of salt, vanilla and 1 Tbl. of milk.  Beat until smooth and fluffy.  If it is too thick, add another Tbl. of milk.      

Thursday, 28 April 2011

Lemon Poppy Seed Muffins

These muffins are soooooo good.  
Just imagine biting into a warm, moist, lemony muffin with an ooey gooey glaze on top.  Pure goodness!  

They have slightly less fat than most muffins, because they use non-fat yogurt and less oil.  Make it Love it!
Lemon Poppy Seed Muffins
From: Jenn@eatcakefordinner
  • 2 c. flour
  • 2 tsp. baking powder
  • 1/4 tsp. baking soda
  • 1/4 tsp. salt
  • 2/3 c. sugar
  • 2 lemons, zest & juice
  • 1 c. plain, non-fat yogurt
  • 2 eggs
  • 2 tsp. vanilla
  • 1 tsp. lemon extract
  • 1/4 c. vegetable oil
  • 2 Tbl. poppy seeds
Glaze:
  • 3/4 c. powdered sugar
  • 1- 2 Tbl. milk
  • 1/2 tsp. lemon extract
Combine sugar and lemon zest and rub together with your fingers until fragrant. Add flour, baking powder, baking soda and salt.  In a separate bowl, combine lemon juice, yogurt, eggs, vanilla extract, lemon extract, oil and poppy seeds.  Add to dry ingredients and stir with a wooden spoon until combined.  Do not overmix.  Divide evenly into greased muffin tins.  Bake at 375 degrees for 14-15 minutes or until lightly browned.  Yield: 16 muffins.  Combine all glaze ingredients and stir until smooth.  If it is too thick, add a little more milk.  Drizzle over slightly cooled muffins.  


Monday, 25 April 2011

Ultimate Ham Sandwich

Here is a great way to use up all that leftover ham from Easter dinner.  This sandwich is the cover recipe of the April 2011 issue of Food Network Magazine.  It is pretty much your basic sandwich, except for the fact you can make your own Mayonnaise.  I opted to use store-bought Mayo and one of Big Daddy's recipes to spice it up, which is also included in the magazine. 
Ultimate Ham Sandwich

thick slices of crusty white or rye bread
homemade Mayonnaise or Dill Mayonnaise
lettuce
sliced tomato
thick slices of leftover ham
dill pickle slices
sliced Cheddar cheese
whole grain mustard, opt.


Spread Mayonnaise on a thick slice of crusty bread.  Top with lettuce, sliced tomato, leftover ham, a few dill pickle slices and sliced Cheddar.  Spread whole-grain mustard on another slice of bread, then close the sandwich.  


Dill Mayonnaise
adapted from: Big Daddy
1 c. Mayonnaise
1 Tbl. fresh lemon juice
1 Tbl. chopped dill (I used dried)
2 tsp. minced shallot (I didn't add, but I think it would be really good)
1 tsp. lemon-pepper seasoning
salt and pepper


Combine Mayo with lemon juice, chopped dill, minced shallot and lemon-pepper seasoning.  Season with salt and pepper.  

Friday, 22 April 2011

Grandma Parker's Carrot Cake

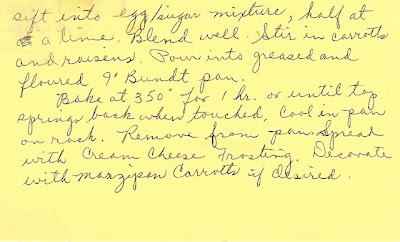
I can't tell you how much this recipe means to me, not because I remember my Grandma making this cake, but because it was my Grandma's recipe.  Just look at her beautiful cursive handwriting.  I don't remember my Grandma cooking a lot while I was growing up, except for on Holidays and family get-togethers.  Maybe it was because I was young and didn't care about cooking and I didn't pay attention much (shocking, I know).  

 I was talking to my Grandpa and I found out that my Grandma loved to cook and bake and he said she was really good at it.  He said she loved to sit and watch cooking shows like Gabby Gourmet and Julia Child and loved to copy down recipes every chance she got or cut new recipes out of newspapers.  (Now I know who I got it from!) He then showed me a huge drawer full of recipe boxes which were full of handwritten recipe cards and newspaper clippings.  I found newspaper clippings from way before I was even born, weird huh?  He let me pick out a box to keep (I chose the one in the below picture.  Look how cute the bright flowers are.  It even has a price tag on the side that says .79 cents - you could never get a recipe box for that price now-a-days).  I was so happy to have something of my Grandma's and especially something that I know she once cared enough to take the time to handwrite all of these recipes.  I will cherish it forever!     
This recipe is the most unique carrot cake I have ever seen.  I have never ever seen a carrot cake recipe that uses butter?  They always use vegetable oil?  Also, all the recipes I have seen use regular sugar, but this one uses brown sugar and it also calls for lemon juice, which I had never seen before?  I really should have tried the recipe exactly as she had written, but I decided to add the butter plus some vegetable oil, because I wanted my cake to be really moist.  I also added a little more cinnamon and a little bit of regular sugar, but I think you could leave the extra sugar out and it would taste just as good.      

I decided to cut the recipe in half, since there would only be two of us eating it (that is why the cake in the above picture looks so small).   I had big plans to decorate it all cute, but I couldn't wait any longer, I had to try it.  It turned out soooooo good.  It did sink a tiny bit in the middle, but that was probably because I opened my oven door too soon, but it was incredibly moist and the amount of spice was perfect.  I even liked it better the next day.  This cake is irresistible.  
Grandma's Carrot Cake:
From: Grandma Parker

1/2 c. butter, melted
1/2 c. vegetable oil
4 eggs
1 1/3 c. brown sugar, packed
1/3 c. sugar
1 Tbl. fresh lemon juice
2 1/4 c. flour
2 tsp. baking powder
1 tsp. baking soda
1/2 tsp. salt
2 tsp. cinnamon
1/2 tsp. nutmeg
3 c. grated raw carrots

Preheat oven to 350 degrees.  Beat eggs and both sugars together until light and fluffy, stir in melted butter, vegetable oil and lemon juice.  Combine flour, baking powder, soda, salt, cinnamon and nutmeg.  Sift into egg/sugar mixture, half at a time.  Blend well.  Stir in carrots.  Pour into desired greased and floured pan(s).  For 9" bundt pan, bake for one hour or until top springs back when lightly touched.  I cut the recipe in half and used two small round pans and baked for about 35 minutes.  Cool in pan 15 minutes, then invert to a wire rack and cool completely.  Frost with favorite cream cheese frosting.  

Wednesday, 20 April 2011

FUSS-FREE RAVIOLI & CHEESE BAKE

I love a good fuss-free recipe for dinner!  It might not seem like it, because a lot of my recipes have a lot of hands-on work, but I really do like the occasional super easy dinner, especially on a weeknight when I have been at work all day.  I like to save my more-detailed recipes for Sundays.  

This dish is super easy.  Throw everything in a casserole dish, bake, top with cheese and eat.  Wallah. . . . you're done!  I was planning on adding some hamburger to this dish, but I forgot to thaw it, so I didn't add it and I was glad I didn't, because this dish is plenty filling on it's own. I cut the recipe in half and I was worried that 9 oz. of ravioli wasn't going to be enough for two people, because it didn't look like very much, but trust me, we had enough for two people, plus plenty leftover.  I would make this again.

Fuss-Free Ravioli and Cheese Bake
adapted from: Kraft Recipes

1 jar (16 oz.) spaghetti sauce
1 can (14.5 oz.) diced tomatoes, undrained
1 can (10 oz.) low-sodium beef broth
1/4 cup zesty italian dressing
2 pkgs. (9 oz. each) refrigerated cheese filled ravioli
1 cup shredded Mozzarella

Preheat oven to 375 degrees.  Combine first four ingredients in a 9x13 dish; add ravioli; toss to coat.  Bake 50 minutes or until ravioli is tender.  Top with cheese; let stand 5 minutes or until melted.  Yield: 6 servings. 

Sunday, 17 April 2011

Texas Roadhouse Rolls

Whoever created the roll recipe at Texas Roadhouse is a genius and whoever decided to give them to guests as a "complimentary appetizer" is a genius.  What is the first thing you hear from people when they talk about Texas Roadhouse?  I hear "I love their rolls," I have never heard anyone start out by saying "I love their pulled pork sandwich," have you?  Don't get me wrong, they have really good food too, but their rolls are unbeatable.  

I found this copycat recipe floating around the blog world and I couldn't wait to give them a try.  Honestly, I was extremely skeptical about these.  Why?  Texas Roadhouse uses a "roll mix" to make their rolls, so I doubt anyone, other than the creator, knows the real recipe.  They also use a combination of butter and margarine (I read the package on the butter the baker was adding to the mix and that is what it said).  I wanted to try them anyway, because secretly, I was hoping maybe they would at least kinda taste like them?

Well, the moment you have been waiting for . . . . Did they taste like the real thing . . . . Mine did NOT taste anything like Texas Roadhouse's?  Maybe it was something I did wrong?  I did use half bread flour and half all-purpose flour?  However, they turned out really really good.  They are way too soft, light and fluffy to be Texas Roadhouse's.  I must say, I have no complaints about these rolls.  I love super soft rolls.  So, if you want a good roll recipe, you can't go wrong with these.  I ate them with cinnamon honey butter and I even preferred them way more than what I made for dinner.  I did eat three of them in one sitting . . . don't tell!
Texas Roadhouse Rolls - Copycat Recipe
adapted from: Good Stuff Maynard

4 tsp. active dry yeast
1/2 c. warm water
2 c. milk, scalded and cooled to lukewarm
3 Tbl. of melted butter, slightly cooled
1/2 c. sugar 
2 quarts all purpose flour (7-8 cups)
2 whole eggs
2 tsp. salt

Dissolve yeast in warm water with a teaspoon of sugar; let stand until frothy.  Combine yeast mixture, milk, 1/2 cup sugar and enough flour to make a medium batter (about the consistency of pancake batter).  Beat thoroughly.  Add melted butter, eggs and salt.  Beat well.  Add enough flour to form a soft dough.  Sprinkle a small amount of flour onto counter and let dough rest.  Meanwhile, grease a large bowl.  Knead dough until smooth and satiny and put in greased bowl; turn over to grease top. (I used the dough hook on my Kitchen-Aid to knead this for about 4-5 minutes).  Cover and let rise in a warm place until double in bulk.  Punch down.  Turn out onto a floured board.  Divide into portions for shaping; let rest 10 minutes.  Shape dough into desired forms.  Place on greased baking sheets.  Let rise until doubled.  

Bake at 350 degrees for 10-15 minutes or until golden brown.  Baste immediately with butter.  Yield: 5 to 6 dozen.  Serve with Cinnamon Honey Butter.  

*Jenn's Notes: I shaped my rolls by rolling out the dough into a rectangle, about 1/2-inch thick, then I folded the rectangle in half, making it about 1-inch thick. I used  my rolling pin and rolled over the dough, ever so gently, just to seal the two halves together.  I then used a dough scraper and cut the rolls into squares and placed those on my greased baking sheet.  I cut the recipe in half and I got exactly 12 big rolls and baked them for 16-17 minutes.  In order to get the 5-6 dozen rolls like the recipe states, you would have to make really small rolls.          

Saturday, 16 April 2011

Easter Pink Bunny Cupcakes

I made these cupcakes long before I ever had this blog.  I took this using my I-Phone and didn't care about lighting or anything.  Since it is almost Easter, I thought it would be fun to share these with you.  I took these to my Families Easter Barbeque and they were a huge hit with my little nieces.  I tried to find a better picture of these for you around the internet, but I had no such luck, but I did find some other cute cupcake ideas:


Easter Bunny Cupcakes Recipe


Here's how to make Pink Bunny Cupcakes:
From: Woman's World Magazine April 2009 Issue

- 8 cupcakes, any flavor.  I recommend My Favorite Box Mix Recipe.  It will make a lot more than 8 cupcakes, but you could just frost the extra with cute pastel Easter colors.  
- Tint vanilla frosting (store bought or homemade) with pink food coloring
- Transfer to a large pastry bag (or zip-lock) fitted with a small star tip
- Starting at edge, pipe frosting over each of 8 cupcakes, building up in the center (so when you put his "face" on it is slightly raised above the rest of the cake).
- Using kitchen scissors, snip 1/4'' off each flat end of 16 large marshmallows; pinch top to make pointed "ear"
- Press 1 red Swedish fish, textured side down, onto 1 cut side of each marshmallow "ear"
- Insert two "ears" into top edge of each cupcake
- For "cheeks," use flattened mini marshmallows
- For "eyes," use brown mini M&M's
- For "noses" and "mouths," use Jelly Belly Petite Sour Hearts candies 
- For "whiskers," use 1 1/2'' long pieces red Twizzlers Pull-n-Peel candy

These are linked up at Sweets For Saturday!

Wednesday, 13 April 2011

My Go-To Buttermilk Biscuit Recipe

Did you know that I used to strongly dislike biscuits?  It was something about the dry feeling that makes you feel like you couldn't swallow without a glass of water (or milk for you milk lovers) that I couldn't stand.  I must have been eating really bad store-bought biscuits, because I really like homemade biscuits now. My perfect biscuit is crispy on the outside, but soft, buttery and flaky in the inside.  This is my go-to recipe for biscuits.  They satisfy all four of my perfect biscuit requirements and they are a sweeter biscuit.  I love them warm with jam or honey or with eggs, ham, Feta cheese and Cheddar cheese for a breakfast sandwich or even with sausage gravy.  I still like to try new biscuit recipes, but when I feel like biscuits I know I will love, I make this recipe.  
Buttermilk Biscuits
from: Jenn@eatcakefordinner


2 1/2 c. all-purpose flour
3 Tbl. sugar
1 1/2 Tbl. baking powder
1/4 tsp. salt
1/2 c. unsalted butter, cold, cut into cubes
1 c. buttermilk, plus more if needed


Combine flour, sugar, baking powder and salt; mix well.  Add the cold butter cubes and using a pastry cutter, cut in the cold butter until resembles coarse crumbs with small chunks of butter throughout.  Make a well in the center and slowly incorporate the buttermilk until just combined.  If dough seems too dry, add a little extra buttermilk.  Do not overmix.  Turn out dough onto a lightly floured surface and pat into rectangle (try to handle dough as little as possible).  Cut out biscuits using a round cutter.  Place on greased cookie sheet.  Bake at 350 degrees for 12-15 minutes.  Yield: 8-12 biscuits.    

Friday, 8 April 2011

Orange Dreamsicle Cookies

mmm . . . 
mmm . . .
mmm . . . 
These are one of my favorite cookies!  The cookie itself is chewy and moist with a hint of freshness from the orange zest and a sweet, melt-in-your mouth feeling from the white chocolate chips.  There is just something about orange and white chocolate together that is irresistible.   
To prevent myself from eating every last one of these cookies (because, I really would eat every last one), I piled them up and took them to work to share with all of my co-workers!  They are always a huge hit!   
Orange Dreamsicle Cookies

2 1/4 c. flour
3/4 tsp. baking soda
1/2 tsp. salt
1 c. (2 sticks) unsalted butter, room temperature
1/2 c. sugar
1/2 c. light brown sugar
1 egg
1 tsp. vanilla
1 1/2 - 2 Tbl. grated orange zest 
1 1/2 c. white chocolate chips

Preheat oven to 350 degrees.  Combine flour, baking soda and salt; set aside.  In a large bowl, cream together the butter and both sugars until light and fluffy.  Add the egg and vanilla and mix until combined.  Add the orange zest.  Gradually add the flour mixture and beat thoroughly.  Stir in the white chocolate chips.  Using a small ice cream scoop, drop dough onto a lightly greased cookie sheet.  Bake 10-11 minutes.  Yield: around 30 cookies.  

Wednesday, 6 April 2011

CHICKEN CORDON BLEU PANINI'S

Are you tired of the same old thing for dinner?  Do you wish you could put a twist on some of your old favorites?  Well, I have the perfect "twist" for you.  Chicken Cordon Bleu Panini's!!  Oh yeah!  I saw this idea over at Panini Happy and it sounded good, but I had no idea how good it really was until I took that first bite.  There was so much flavor packed into that one little sandwich.  Juicy chicken, black forest ham, swiss cheese and homemade honey mustard! I've never been a honey mustard fan, but I loved this homemade version.  This was the perfect combination of flavors and is one of my new favorite sandwiches.  More . . . please!! 
Chicken Cordon Bleu Panini

Chicken
1 Tbl. Extra Virgin Olive Oil
1 Tbl. Butter
1/2 c. flour
1 egg, beaten
1 c. panko bread crumbs
4 thin-cut boneless, skinless chicken breasts or 2 chicken             breasts, cut in half horizontally
salt and pepper

Honey Mustard
1/4 c. Mayo
1 Tbl. prepared mustard
1 Tbl. honey
1/2 Tbl. lemon juice

To Prepare:
1 loaf French Bread
deli Black Forest ham
sliced Swiss cheese

For the chicken: Heat olive oil and butter in skillet over medium-high heat.  Season chicken with salt, pepper and a little Mrs. Dash.  Dip each chicken cutlet into beaten egg, then flour, then coat with the panko bread crumbs.  Place in heated skillet and cook until bread crumbs are browned and crispy, flip over and cook the other side until cooked all the way through.  Remove to plate.  For the sauce: combine all ingredients until smooth.  To prepare: slice French Bread in half horizontally and spread top half with honey mustard.  On bottom half, layer chicken, sliced ham and cheese.  Top with other half of bread.  Cut into four servings and grill each until crispy and cheese is melted.  (I grill mine on the George Foreman).  Yield: 4 servings.  

*Note: When I cut my French Bread in half, I scooped out some of the bread on each half, so my sandwich wouldn't end up so thick.  

Sunday, 3 April 2011

Mini Bundt Cakes

I just got this new cute mini bundt pan in the mail the other day and I immediately had to try it out!  Since I needed a fast recipe, I decided to go with a box mix rather than make cake batter from scratch.  My friend, Ashlee, recommended this recipe of her Mom's.  Let me just tell you, it is the BEST cake mix recipe I have ever made and it will probably be my GO-TO cake mix recipe from now on.  Yeah, it was that good.  They are so light that you can eat 10 in one sitting and not even feel like you've eaten any!!    

All you do is take a white cake mix and jazz up the flavor by adding a few extra ingredients.  One of those ingredients was sour cream, but I had purchased a carton of non-fat plain yogurt from the store and decided to try that instead (why not save myself a few calories, right).  The finished cake turned out so incredibly soft and tender, but not so soft that it falls apart when you try to eat it.  I could cut a piece with a fork and actually have the entire piece make it to my mouth without falling off the fork.  Honestly, it was pretty darn close to the perfect texture in my opinion.  Now, if I could only find a "scratch" recipe with that same texture?  

The possibilities are endless with this recipe.  You can make whichever flavor of cake you desire.  The pudding you add will help determine what the flavor will be.  This time, I tried a box of coconut cream pudding and added a little coconut extract.  So good!  You could do chocolate fudge, banana, lemon, pumpkin, white chocolate, cheesecake, etc . . .  Then, add a flavor of extract that would compliment the flavor of the pudding.  I was thinking white chocolate with orange extract or chocolate fudge with almond extract or cheesecake with lemon extract would all be so delicious!     

Oh, and look how cute they turned out using my little bundt pan!   
   
Bundt Cake
adapted from: Kelly P.

1 box white cake mix
1 box instant pudding (the flavor you want your cake to be)
3/4 c. water
1/2 c. sugar
3/4 c. oil
1 c. sour cream (I used non-fat plain yogurt)
4 eggs
1 tsp. any flavor extract (to match the flavor of pudding)

Preheat oven to 350 degrees.  Combine all ingredients in a large bowl; mix well.  Pour batter into a well greased and floured bundt pan.  Bake for 45 minutes or until done.  Cool in pan 10 minutes.  Then, remove from pan and cool completely.  Microwave 1 can of store-bought frosting for one minute or until runny.  Drizzle 1/2 of the can over the cake.  Let set then serve.  If using a mini bundt pan bake for 16 minutes.  Yields: 1 large bundt or at least 36 mini bundts (I lost the exact count because I ate too many!).     

Thursday, 31 March 2011

TUSCAN GARLIC CHICKEN

I guess this is a copycat Olive Garden recipe?  I've never had their version, but I found this version over at Mel's Kitchen Cafe (Shocker, another yummy recipe from Mel's site).  This turned out sooooooo good.  The sauce is so creamy and flavorful, you would never know the cream was cut way back and low-fat milk was added in its place.  


I made the entire sauce recipe, but I used one extra-large chicken breast from Costco and cut it in half, horizontally.  I love tonz of sauce, but the full recipe gave me more than plenty for two people with some leftover.  Next time, I will probably cut the sauce in half if I am only making two servings.  This really does taste like it came from a fancy Italian Restaurant!   
Tuscan Garlic Chicken
adapted from: Mel's Kitchen Cafe

3/4 c. all-purpose flour
1/2 Tbl. salt
1 tsp. pepper
1/2 tsp. dried basil
1/2 tsp dried oregano
4 boneless, skinless chicken breasts
5 Tbl. extra-virgin olive oil, divided
1 Tbl. finely minced garlic (4-5 cloves)
1 red bell pepper, chopped
1/2 c. low-sodium chicken broth
6 oz. fresh spinach, washed and chopped
1/2 c. heavy cream
2 tsp. cornstarch
1 c. low-fat milk
1 c. freshly grated Parmesan cheese
1 Lb. fettuccine


Preheat the oven to 350 degrees F.
In a shallow pie plate or similar dish, combine the flour, salt, pepper, basil and oregano. Dip each chicken piece in the flour mixture until both sides are well coated.
In a large 12-inch nonstick skillet, heat 3 tablespoons of the olive oil over medium heat until the oil is hot and shimmering. Carefully place the chicken breasts in the pan, cooking them for 2-3 minutes on each side, until they are golden and browned but not cooked all the way through (they’ll finish up in the oven). Don’t scoot the chicken around once you lay it in the hot oil! Let the oil work it’s magic to sear the crust on the chicken. If you get all antsy and try flipping too early and/or moving the chicken around the pan, the breading is likely to fall off. Gently remove the chicken to a foil-lined, lightly greased baking sheet and bake in the preheated oven for about 15 minutes, until the chicken is cooked through. Set aside and tent with foil until ready to use.
While the chicken is cooking, heat a large pot of water to a boil and add the noodles, cooking until al dente. Also, wipe out the skillet with a couple paper towels and return it to medium heat, adding the remaining 2 tablespoons olive oil. When the oil is hot, add the garlic and bell pepper, sauteing for 2-3 minutes.
Stir in one tablespoon flour and stir constantly while cooking for another minute. Add the chicken broth to the skillet and bring the mixture to a low simmer, whisking constantly, until slightly thickened, about 3-4 minutes. In a small liquid measure, whisk together the cornstarch and cream. Add the spinach, milk and cream mixture to the skillet. Bring the mixture to a simmer and cook, stirring occasionally, until the spinach is wilted and sauce is slightly thickened, about 4 minutes. Stir in the Parmesan cheese.
When the pasta has finished cooking, drain and return it to the pot. Toss the pasta with half of the cheese sauce. Place some of the coated pasta on each plate. Top with a breaded chicken breast and spoon some of the sauce over the top of the chicken and pasta. Serve immediately.           
*Mel's Notes: if the chicken breasts you are using are overly thick, you can butterly them, cutting all the way through so you end up with two thinner cuts of chicken breast. Second note: I would say this recipe is right on the edge of just having enough sauce but not an overabundance, so if you like things on the saucier end of the spectrum, feel free to double that part of the recipe.
*Serves 4-6 (depending on if you are serving adults or kids)

Sunday, 27 March 2011

Strawberry Rice Krispie Treats

Yesterday was such a nice day and it finally felt like Spring!  Did you know it was already officially Spring?  Here are some fun and delicious Spring-y rice krispies for you! Not much to say, you have all had these marshmallow treats before.  The only difference in these is that I used Strawberry Flavored Marshmallows and a little strawberry extract to give them a stronger strawberry flavor!  I love the addition of the extract and I highly recommend it, but if you don't think you would ever use it again, I probably would not buy it just for these. 
Strawberry Rice Krispie Treats
from: Jenn@eatcakefordinner

4 Tbl. unsalted butter
1 (10 oz.) bag Strawberry Marshmallows
1 tsp. strawberry extract, opt. 
6 c. Rice Krispies cereal

In a large pan, melt butter over medium heat.  Add marshmallows and stir until melted and smooth (sometimes I add an extra 1 cup of plain marshmallows if I feel like having them extra chewy).  Stir in the extract.  Remove from heat and add the cereal and stir until completely coated with marshmallows.  Pour into a greased 9x13 pan.  Using the back of a spoon that has been greased with butter, smooth out the top of the rice krispies.  Cut into squares and serve.  
easy apple pie recipe that will rock in your house
betty crocker banana bread recipe 1970 banana nut bread paula deen
that give mcdonalds coupons and 
breakfast coupons you also can find recipe from